Tuesday 31 December 2013

Twitter Guide 2014

Twitter Guide 2014

Customize :
  • Change your profile picture. Use a picture of yourself to make it seem more personalized if this is your personal Twitter account.
  • Utilize as much of the 160-character limit Twitter BIO space allows. Include keywords your followers or potential followers may be searching for.
  • Create your own background image. However, do not make the image too much like an ad or sales pitch. The background image must be less than 800k and we recommend a size of 1600x1200 for a large image or smaller if you plan on tiling the image or just having it on the left-hand side. Finally, keep in mind that smaller resolutions and monitor sizes will hide much of the background.
Third-party tools :
Take advantage of the hundreds of different third-party online tools and services that enhance your Twitter experience. Below are a few of our favorites.

  • TwitPic - Take advantage of TwitPic to post pictures on your tweets. If you want to post pictures while away from the computer, use the Twitterific app.
  • Qwitter - Great service that sends an e-mail any time someone unsubscribes from your Twitter profile and mentions a possible Twitter post you made that may have caused them to leave.
  • Manageflitter - Fantastic site for managing your followers and getting an easy to read overview of people not following you back, quiet users, and inactive users.
  • WeFollow - Great website that allows you to add yourself to a listing of Twitter users by tags you find interesting.
  • SocialOomph - Another great service with a collection of free Twitter tools including the ability to schedule when a tweets gets posted.
  • Tweetbeat - An excellent site that takes the trending topics on Twitter and gives you a clearer explanation of present and past trending topics.
  • TwitterMeme - Another great location to find the hottest links on Twitter.
  • Twitter Grader - Great service that grades any Twitter account and gives you additional details and ranking information.
  • Twitter Fan Wiki Apps - Finally, this wiki has a listing of several hundred different Twitter applications and tools for users wanting more.

Use Twitter search :
Take full advantage of the Twitter search tool. Below are just a few tips that can help improve your search capabilities on Twitter.
  • Search for your website or blog URL and see if others are mentioning your page.
  • Find people who you may enjoy following by searching for keywords that interested you.
  • Need more options, use the Advanced Twitter search.
  • Any time you get excellent results click the "Save this search" button to save that search. These searches can then be found under "Saved Searches" on the right-hand part of your profile on the old Twitter interface or under the "Searches" tab next to your timeline on the new Twitter interface.
Followers :

  • Engage followers.
  • Do not follow too many people. No one is going to follow someone who is following thousands of people but only has 10 followers.
  • Retweet interesting posts.
  • Retweet and participate in conversations with people with a lot of followers.
  • Realize it is impossible for anyone to read every tweet.
  • When first joining do not follow hundreds of people, doing this may mark you as a bot.

    Create useful and interesting tweets :

    • Try making all your tweets informative, useful, or funny.
    • Do not post mundane posts, e.g. eating a bowl of cereal.
    • Add hastags to your tweets. For example, if your tweet is about computers, consider adding #computer in the tweet.
    • Tweet frequently. No one is going to follow someone they do not know who has not tweeted in months. Try at the very least to tweet a few times a week or daily if you can manage.
    • Do not whine or complain. Everyone will unfollow anyone who constantly whines or complains.
    • Try making your valuable tweets during the times people will most likely see them.
    • Keep some space available in your tweet in case someone retweets your post.
    • Twitaholic - A full listing of the top users on Twitter based on Followers. This is a terrific service to find and follow the top users and possibly incorporate some of the ideas they are doing on their account.

        Tip: Many of the first few hundred people are celebrities on Twitaholic, if they do not interest you skip the first page.
        Create and use lists
        Twitter list iconTwitter lists are an excellent method of filtering filter through the people you follow. To create a list, click the Lists link and then Create a list. After creating a list visit the persons profile page you wish to add and click the list icon, as shown in the picture to the right.
        Go Mobile
        Apple iPhones, Blackberry phones, Android phones, Windows phone 7 phones, and most of the other smart phones have Twitter applications. Take full advantage of these applications. For users who do not have smart phones Twitter also has extensive support for SMS, which can send tweets over a text message.

        I hope You would like this post :) If you have any other issues regarding Twitter or any other tropic,
        you can ask below in comments.

        Tuesday 24 December 2013

        Merry Christmas everyone!


        Android Revolution HD Team would like to wish you all Merry Christmas and a happy New Year 2014.
        May love and happiness be a part of your everyday life. 
        Forget about the problems and enjoy the moment. Smile, laugh and share the love.

        Of course, we also wish you quick Android updates and a lot of flashing.

        Android Revolution HD

        Wednesday 18 December 2013

        How to: Use "adb sideload" on your Android device


        Probably every Android power-user at least once in his life used ADB - Android Debug Bridge. It is a versatile command line tool that lets you communicate with an emulator instance or connected Android-powered device. Using ADB shell commands gives you additional control over your device and sometimes it can save your device from being bricked (example: How to: copy ROM zip file to the freshly wiped device). You can find some more basic information about ADB here.

        Since Android Jelly Bean there has been a new ADB mode available in the AOSP recovery, incorporated by the Android developer community into custom recoveries too. It is called "ADB sideload" and most of you probably have heard about it already. This is an alternate method to the one I wrote about here - How to: copy ROM zip file to the freshly wiped device. The main difference is that ADB sideload works only with recoveries based on Jelly Bean source or newer. I believe that ADB sideload was created to simplify the process of flashing/restoring Android update.zip packages.

        Keep in mind that while using ADB sideload, the regular ADB shell won't work. To be able to use SIDELOAD mode make sure you're running latest ADB drivers from the Android SDK (Platform-tools). Here are the simple steps you need to follow to flash update.zip package using adb sideload mode (based on stock Android recovery):
        1. Place the ZIP package you want to install in the same location where you keep ADB drivers - adb.exe, AdbWinApi.dll and AdbWinUsbApi.dll (usually it's SDK\platform-tools)
        2. Make sure you have USB debugging enabled in Settings > Development on your device
        3. Make sure your phone drivers are installed on the PC you're going to use
        4. Boot your device in recovery mode (Android logo with a exclamation mark) and connect your device to PC
        5. Hold down "power" button first, followed quickly by "volume up" button. You should now see the recovery menu
        6. Use the volume up/down keys to select "apply update from ADB," then press power to select it
        7. Open a command prompt on the PC (cmd.exe), type and confirm with ENTER:
        8. cd /d <adb.exe location> (for example: cd /d c:\SDK\platform-tools) or you can open your SDK/platform-tools folder, then press SHIFT button and the right-click mouse button and choose “Open command prompt here
        9. adb sideload <filename>.zip (for example: adb sideload update.zip)
        10. The zip package will begin installing. When it's done, select "reboot system now."
        How is that different from the alternative method? You don't have to manually create the proper folders structure, push the file and later install if from inside the recovery menu. The result is basically the same, because ADB sideload is also transferring the zip file into the device internal memory and later it automatically begins the installation procedure. However, it works only with recoveries based on Android Jelly Bean source.

        Have any questions or comments? Feel free to share! Also, if you like this article, please use media sharing buttons (Twitter, G+, Facebook) below this post!

        Thursday 12 December 2013

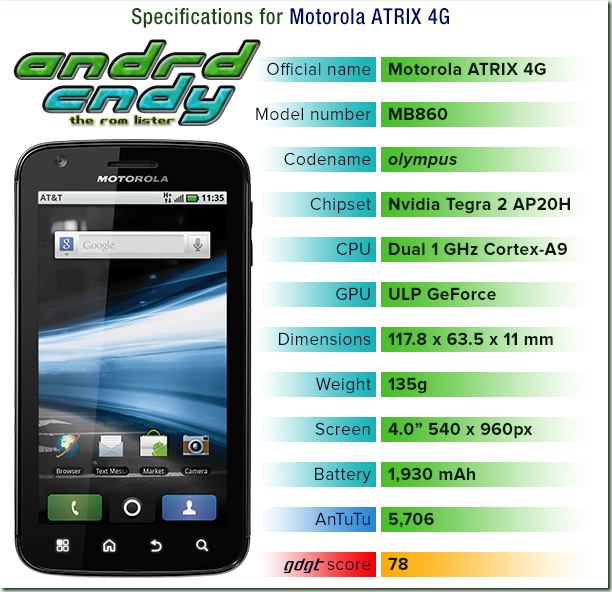
        Motorola ATRIX 4G (olympus) ROM List

        olympus

        *Flash your device at your own risk* 1103

        ROM:

        '(11/21/2013) Olympus CyanogenMOD 9 (4.0.4)

        '(11/14/2013) Team Hope AtrICS v2.0 +

        '(11/06/2013) ElmasROM (2.3.7)(CM7.2)

        '(09/30/2013) MoKee OpenSource FINAL (4.2.2)

        _____________________________________________________

        '(08/26/2013) Smart Light (4.2.2)(CM10.1)

        '(08/01/2013) Unofficial CM 10.2 preview (4.3)

        '(07/26/2013) Neutrino ROM v3.02 (CM7)

        '(07/23/2013) MIUI v5 3.7.19 English (4.1.2)

        ROMS THAT WERE RELEASED BEFORE JULY WON’T BE LISTED

        *All source links are from xda-developers forum*

        Permalink: http://goo.gl/C5EyM | http://sh.st/0q3w

        codename: olympus model number: MB860 views: 218,170

        Monday 9 December 2013

        How to: Manually install an OTA update on your HTC device

        Sometimes it turns out that your device for some reason can't find the most recent OTA (Over The Air) update. However, there is a solution to apply OTA update manually, without being forced to wait for the update being downloaded and installed by your device.

        Facts you need to know before continuing:
        1. This method has nothing to do with the "adb sideload" feature available on Android devices since Jelly Bean. It should work on every Android HTC device.
        2. Read about different software versions for the HTC devices here. Keep in mind that the OTA update must match the software version on your device. Each original OTA update.zip package has 2 different software versions in its name - the version of the software that must be currently installed on your device and the version of the software that your device will run after the update. For example:
        OTA_M7_UL_JB43_SENSE55_MR_HTC_Europe_3.62.401.1-2.24.401.8_release_338160gxmo5sd9337kadux.zip

        As you can see, 2.24.401.8 is the software version you must currently have installed to be able to run the OTA and 3.62.401.1 is the version of the software expected after the update. You can't flash an OTA update on a different software version to that expected by the OTA update for two main reasons:
        1. Formal reason - the OTA update.zip package checks if your system is running the expected software version before it starts to install the update:
          assert(file_getprop("/system/build.prop", "ro.build.fingerprint") == "htc/htc_europe/m7:4.2.2/JDQ39/235216.8:user/release-keys");
          This must match the following build fingerprint from the build.prop. If the versions don't match, the installation of the OTA package will be cancelled.
          ro.build.fingerprint=htc/htc_europe/m7:4.2.2/JDQ39/235216.8:user/release-keys
        2. Technical reason - OTA update.zip packages usually contain patches for the target files. This way OTA update doesn't have to be 1GB size, even if it is supposed to update the whole OS to the newer version. Patch files have an *.apk.p extension (f.g. Camera.apk.p) and each patch file must match the target file (f.g. Camera.apk). To make it possible, OTA update.zip package checks the MD5 checksum of each file on the system partition on your device:
          assert(apply_patch_check("/system/app/Camera.apk",
          "b3b79e40bad0b1bec5fb949ac5f8662f91bee714",
          "5a5bf63e3d7c9de52a7d8d7a292e158263783844"));
          And finally, if the MD5 is correct it applies the patch. All these commands are stored in META-INF\com\google\android\updater-script of each OTA update.zip package. If the MD5 is incorrect, or at least one file is missing, the installation of the OTA package will be cancelled.
          assert(apply_patch("/system/app/Camera.apk", "-",
          b3b79e40bad0b1bec5fb949ac5f8662f91bee714, 4229394, 
          5a5bf63e3d7c9de52a7d8d7a292e158263783844,
          package_extract_file("patch/system/app/Camera.apk.p")));

        Now you are ready to manually apply the OTA update on your device. The methods you'll use is based on Android stock recovery.

        Method 1 (for users with root access)
        1. Make sure you have the stock (original) recovery on your device
        2. Make sure you're running a completely unmodified operating system. Additional files like Superuser.apk or su binary are allowed, you just can't have any system files changed or removed (due to the MD5 check)
        3. Make sure you have a reasonable amount of battery charge remaining
        4. Make sure the OTA update you're about to install matches the software version on your device
        5. Copy the OTA update.zip package to the internal storage /data/media/0/update.zip
        6. Open adb shell or use Android Terminal Emulator and type: echo "--update_package=/data/media/0/update.zip" > /cache/recovery/command
        7. Turn OFF the device (make sure fastboot mode is disabled in settings)
        8. Hold your volume down and power keys until the bootloader starts up
        9. Using the volume keys, navigate down to RECOVERY and press power
        10. The OTA update installation process should now start automatically
        11. Once system is booted you should see a confirmation about the successfully flashed update.
        Method 2 (for users without root access) | This method won't work on the S-ON HTC One M8
        1. Make sure you have the stock (original) recovery on your device
        2. Make sure you're running a completely unmodified operating system. Additional files like Superuser.apk or su binary are allowed, you just can't have any system files changed or removed (due to the MD5 check)
        3. Make sure you have a reasonable amount of battery charge remaining
        4. Make sure the OTA update you're about to install matches the software version on your device
        5. Copy the OTA update.zip package to your device (internal storage preferred)
        6. Turn OFF the device (make sure fastboot mode is disabled in settings)
        7. Hold your volume down and power keys until the bootloader starts up
        8. Using the volume keys, navigate down to RECOVERY and press power
        9. You are now in stock recovery mode. You should see nothing more than a (sometimes spinning) Android with the red exclamation mark above it (an empty black screen is also possible). Wait for a few seconds
        10. First hold volume up, then (with volume up held down) press power button to enter the main recovery menu. This keys combination may vary from device to device. Try different keys combination if the above one doesn't work (might be all three keys all together too)
        11. Navigate down to "apply from phone storage" text and press power to confirm
        12. Navigate to the location where you copied the OTA update.zip package and press power to confirm
        13. Wait (sometimes you might need to follow further instructions on the screen) until the update process is finished
        14. Once system is booted you should see a confirmation about the successfully flashed update.
        Have any questions or comments? Feel free to share! Also, if you like this article, please use media sharing buttons (Twitter, G+, Facebook) below this post!


        For latest news follow Android Revolution HD on popular social platforms:

        Sunday 8 December 2013

        HTC ROM Update Utility (RUU) variants explanation

        Owners of HTC devices might be a little confused when it comes to understanding the current method of numbering used by HTC to mark their software updates. Here you can find a short explanation of this matter.

        First of all, we all know that HTC sells their devices all over the world. Every carrier and region of the world has some more or less different "local settings". By "local settings" I mean things like: emergency call numbers, languages, time-zone settings, network settings, carriers branding, GPS settings and more. Because of that each software for even the same device must be different.

        Secondly, even the same device might use different hardware related to the region of the world. For example, HTC One is available in at least 6 different hardware configurations. One of the main difference is modem version. GSM version of the HTC One uses MDM8215 chip and LTE variant has MDM9215. Verizon (US) is known to have MDM9615. So that's already 3 different versions of the same device.

        Every HTC update has the following numbering structure:

        a.bb.ccc.d

        a - the first number of the software. Normally it doesn't increase very often, but when it does, it usually means newer Android version.
        bb - this number is also a software number. Increasing bb number means some more or less major update based on the same Android version, but sometimes it might even bring newer version of the HTC Sense.
        ccc (also cc or cccc) - this is the number of the region/carrier. It has nothing to do with the software itself being newer or older. More details below.
        d (sometimes dd) - the third part of the software version (the fourth one in the RUU name). Usually indicates some minor update with some hot fixes.


        Example: 3.20.401.3

        So basically, when you are interested in the software version, you should look at a.bb.d (3.20.ccc.3) because ccc (401) means only the region/carrier variant of the software.

        Here is the list I was able to gather of possible RUU variants:

        a.bb.61.d - Orange UK (United Kingdom)
        a.bb.65.d - Orange CH (Switzerland)
        a.bb.69.d - Orange PL (Poland)
        a.bb.73.d - Orange FR (France)
        a.bb.75.d - Orange ES (Spain)
        a.bb.110.d - T-Mobile UK (United Kingdom)
        a.bb.111.d - T-Mobile DE (Germany)
        a.bb.112.d - T-Mobile AT (Austria)
        a.bb.113.d - T-Mobile CZ (Czech Republic)
        a.bb.118.d - T-Mobile PL (Poland)
        a.bb.161.d - Vodafone UK (United Kingdom)
        a.bb.163.d - Vodafone FR (France)
        a.bb.165.d - Vodafone IT (Italy)
        a.bb.166.d - Vodafone CH-DE (Switzerland - Germany)
        a.bb.168.d - Vodafone GR (Greece)
        a.bb.169.d - Vodafone AT (Austria)
        a.bb.206.d - O2 UK (United Kingdom)
        a.bb.207.d - O2 DE (Germany)
        a.bb.401.d - World Wide English (WWE)
        a.bb.415.d - Arabic (UAE/Middle East)
        a.bb.468.d - Turkey
        a.bb.497.d - Morocco
        a.bb.498.d - WWE Brightpoint US (United States)
        a.bb.502.d - Cingular US (United States)
        a.bb.531.d - T-Mobile US (United States)
        a.bb.631.d - Rogers Canada (WWE)
        a.bb.651.d - Sprint US (United States)
        a.bb.661.d - Telus WWE (Canada)
        a.bb.666.d - Bell Canada
        a.bb.707.d - Asia (WWE)
        a.bb.708.d - Asia HK (Hong Kong)
        a.bb.709.d - Asia TW (Taiwan)
        a.bb.720.d - Asia (India)
        a.bb.728.d - Virgin AU (Australia)
        a.bb.751.d - Chunghwa Telecom (Taiwan)
        a.bb.771.d - Hutchison 3G UK (United Kingdom)
        a.bb.777.d - ?
        a.bb.841.d - Telsra WWE (World Wide English)
        a.bb.862.d - Voda-Hutch AU (Australia)
        a.bb.901.d - TIM IT (Italy)
        a.bb.911.d - SK Telecom (South Korea)
        a.bb.980.d - Optus AU (Australia)
        a.bb.999.d - HTC Test RUU
        a.bb.1400.d - China
        a.bb.1401.d - ?
        a.bb.1403.d - HTC China CMCC (China Mobile Communications Corporation)
        a.bb.1540.d - HTC One U.S. Developer Edition
        a.bb.1600.d - ?
        a.bb.1700.d - HTC One Google Edition

        The list is quite long, and I'm sure there are still some some missing. If you know more variants, please let me know in the comments section.

        The 401 and the 707 devices are usually the first ones that HTC prepare updates for. Carrier branded software is usually months after the WWE updates.

        Finally, keep in mind that each software version is connected with the CID (Carrier ID) and MID (Model ID) of your device. That means you can't use whichever version you want, unless you have S-OFF on your device. Each ROM Update Utility.exe package will check your device details (bootloader version, MID and CID) before starting the update process.

        Have any questions or comments? Feel free to share! Also, if you like this article, please use media sharing buttons (Twitter, G+, Facebook) below this post!

        How to: Copy ROM zip file to the freshly wiped device


        Have you ever been in a situation where you mistakenly (or not) wiped the content of the internal storage (including system partition and virtual SD cardon your phone or tablet and unfortunately it doesn't support external storage? Now you can't flash desired custom ROM because you removed it and the device can't be booted due to wiped system partition. Don't worry - it's very easy to fix!

        Here are the steps you need to follow to copy the correct rom.zip package to your internal storage:
        1. Download this mini-sdk package and extract it to c:\mini-sdk
        2. Rename the custom ROM package you want to flash to "rom.zip" and copy it to c:\mini-sdk
        3. Connect your device to the PC
        4. Boot your device in recovery mode
        5. Open a command prompt on the PC (cmd.exe), type and confirm each command with ENTER:
        6. cd /d c:\mini-sdk
        7. adb shell
        8. mount /data (error might mean that /data partition is already mounted)
        9. on Android 4.2 and above: mkdir -p /data/media/0
        10. on Android 4.1.2 and below: mkdir -p /data/media
        11. exit
        12. on Android 4.2 and above: adb push rom.zip /data/media/0
        13. on Android 4.1.2 and below: adb push rom.zip /data/media
        14. Wait for a few minutes until the file is copied. It will looks like command shell is not responding, but that means it's still copying. Wait patiently until you'll see blinking cursor again.
        15. Depends on your custom recovery, use the navigation keys to flash the custom rom.zip package in a typical way you used to flash custom ROMs. It should be on your internal storage now. Done!
        Have any questions or comments? Feel free to share! Also, if you like this article, please use media sharing buttons (Twitter, G+, Facebook) below this post!

        Sunday 1 December 2013

        HTC One with KitKat and HTC Sense 5.5 is finally out!


        Android 4.4 KitKat with HTC Sense 5.5 is now available for the HTC One. This is a must-have update for all HTC One owners.

        Sounds great? Well, you might not be happy after all. So far the update is available only for the owners of the Developer Edition of the HTC One. But there is a good news too - you can have KitKat update on your "regular" HTC One too, without waiting for the official update (which might take few more weeks).

        To make it possible, Android Revolution HD has been updated to 40.x series, based on the official Android 4.4 KitKat & HTC Sense 5.5 update (4.06.1540.2). 

        Why KitKat update is that important? It has several very important changes:
        1. Vastly improved security
        2. Smarter "Location" settings
        3. Better performance
        4. Improved battery consumption
        5. Faster multitasking
        6. Better Google Hangouts integration
        7. ...and much more!
        Here are some screenshots. You can see the new Location settings panel.


        Users feedback so far leaves no doubts - this update brings significant performance improvements. Some users are even reporting, that Android 4.4 with HTC Sense 5.5 gives better performance experience than pure KitKat update for the HTC One Google Edition which we wrote about here. I think this is enough said. Don't stay on your old 4.3 OS and grab newest 4.4 update as soon as possible!

        Link to the original XDA-developer thread
        Link to the download page

        Have any questions or comments? Feel free to share! Also, if you like this article, please use media sharing buttons (Twitter, G+, Facebook) below this post!