Showing posts with label Windows 8. Show all posts

Saturday, 8 August 2015

Enable desable WiFi in Windows 8

ou take your new Windows 8 PC to a coffee shop. You’ve just set up wireless Internet at home. Or you’re one of the lucky ones who has Wi-Fi on a plane. So how do you connect to and manage your laptop’s Wi-Fi connections from Windows 8?

In the past, you’d click on the connection icon in the lower-right corner (this group of icons is called the Notification Area). Then, you’d choose a wireless network and connect from there.
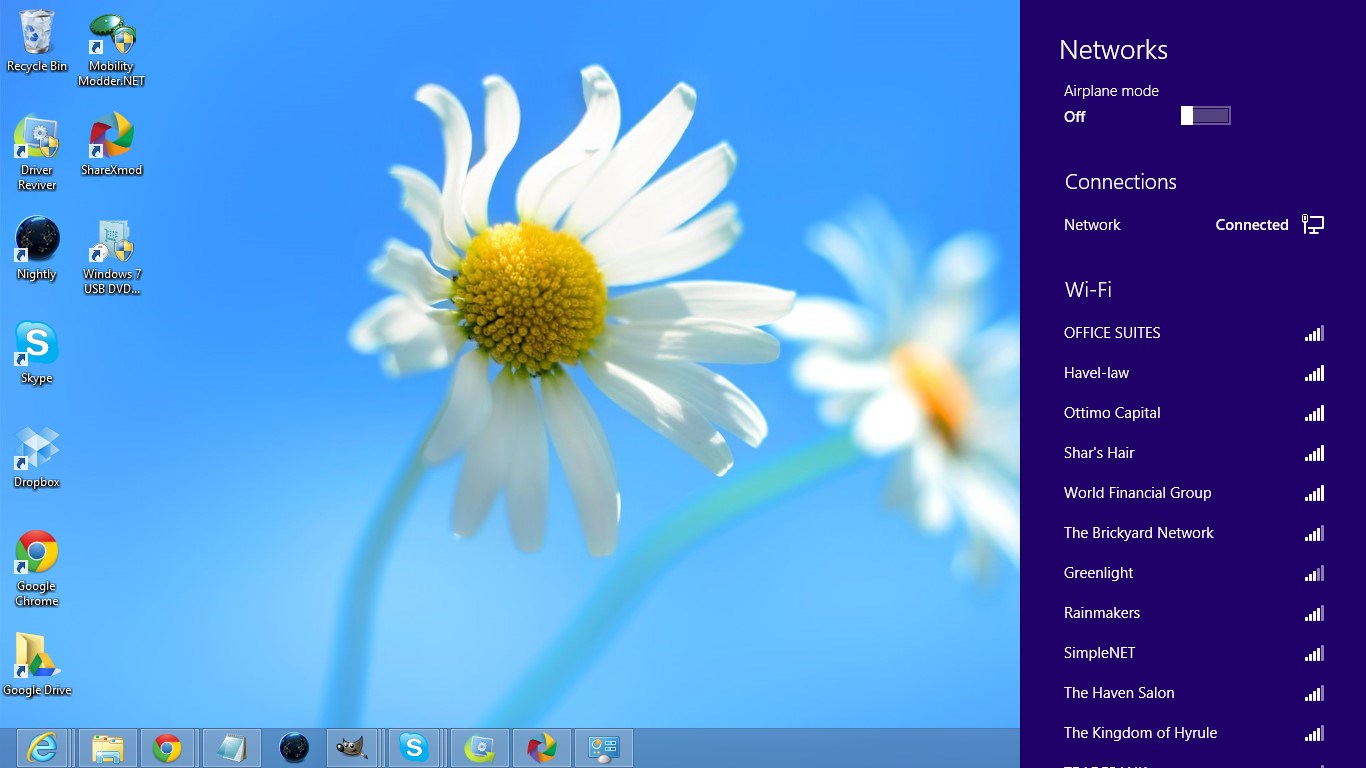
Luckily, you can still do that in Windows 8. Just press Windows + D to go to the Windows 8 desktop, and you should see the familiar connection icon in the lower right. Click on it, and you’ll see a brand-new pane slide into view from the right side.
Enable WiFi Connections
This is the connection pane.
But what if you’d like to manage wireless connections from the Start Screen? Here’s how to do that.
  1. Press the Windows Key to go to the Start Screen
  2. Move the mouse to the bottom-right corner to see a few icons start to appear. Then move the mouse upward. These set of icons are called the Charm Bar
  3. Click Settings
  4. Click the Network icon. You’ll see the same pane as above slide into view

Enable WiFi Connections
Click the Network icon.
At the top is Airplane Mode. Those with a smartphone or tablet will be familiar with this setting. It disables all Wi-Fi connections and saves a lot of battery life … useful when your laptop is aboard a plane that doesn’t have Wi-Fi, or for landing and take-off. Also, you don’t have to use Airplane Mode when on a plane. There are lots of times where you’ll want to turn Wi-Fi off … such as when you’re connected to the Internet via cable.
Next up is your Connections. Here you’ll see an icon with a cable next to it if you’re connected to a hardline, or a series of bars if you’re connected to Wi-Fi. The shaded bars show your connection strength, with five being the highest.
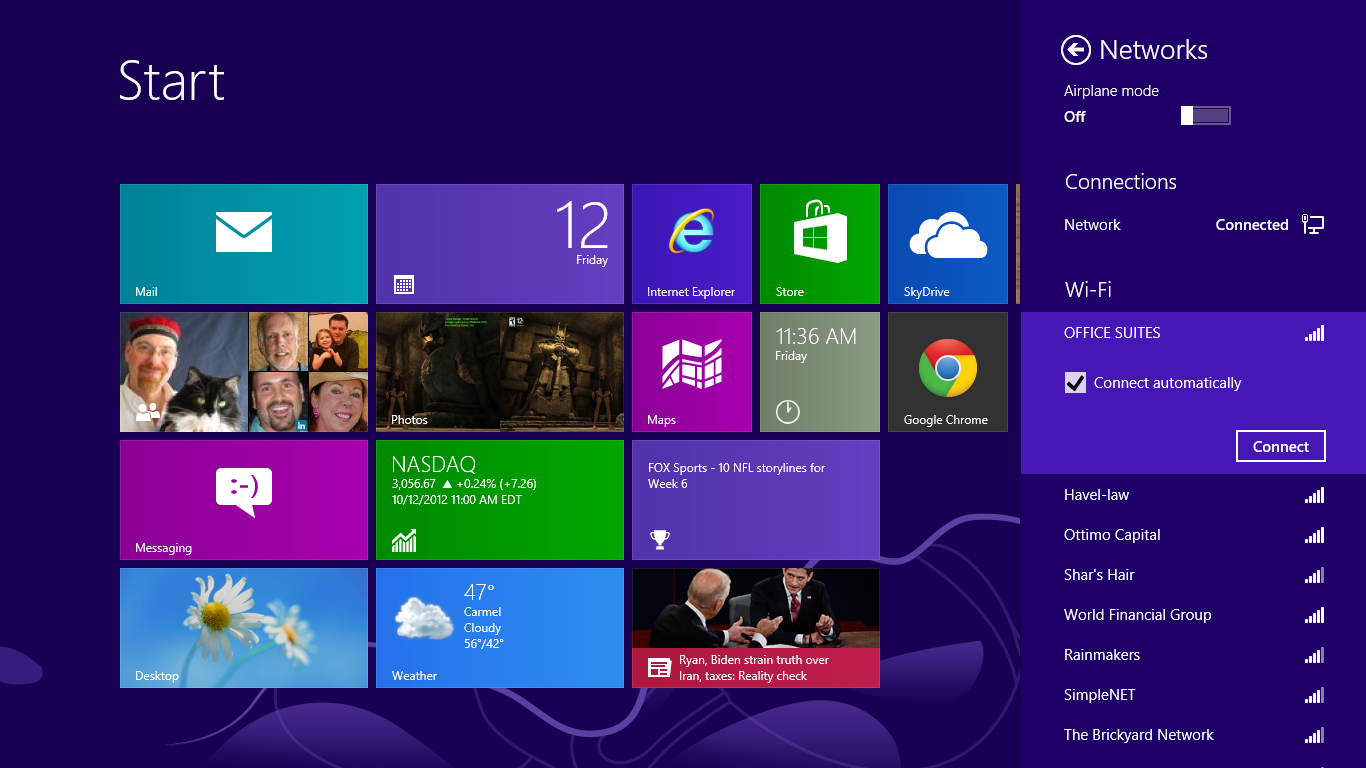
Below that are the Wi-Fi connections available in your area. Find the one appropriate to you and click on it.
If you can select the Connect Automatically check box, your PC will connect to that source every time it’s in range. Then, click Connect. You may need to enter a password, depending on the connection.
Enable WiFi Connections
You can choose to connect automatically.
You can also disconnect from Wi-Fi or connect to a different location from this same screen.

Wednesday, 5 August 2015

How to change user account name in Windows 8.1

When you first install Windows, it prompts you to create a user account and choose a name for it. This becomes your logon name (also called as the user name). Windows also creates a separate display name for you. If you type your full name when creating an account, Windows creates a logon name based on the first name and your full name is stored as the display name. You can easily change your display name from the User Accounts Control Panel but what about the logon name? You can change the logon name too without having to create a new user account but the way to change it isn't so obvious. Here is how to do it.


Several years ago, when Windows XP was released, it featured a new Welcome screen with avatars and a user list. It was friendlier for people who were not familiar with earlier versions of Windows, where you had to type your logon name as well as the password.

The Welcome screen still exists in modern versions of Windows. It shows a list of users with their display name, which is different from the logon name. The display name is usually the first and last name in case of an individual, but it can be anything, and can include special characters like " / \ [ ] : ; | = , + * ? < >. The logon name can't include these special characters. In Windows XP, there was an option to choose between the Welcome screen and the classic style logon. In newer Windows versions, the classic style of logon is made less prominent (it can be enabled using Group Policy).

There are several cases where you might need to view or change your logon name. For example, in an enterprise network, you need to know it to sign in to Active Directory. Depending on the devices you have and your home network setup, the logon name may be required to access various network shares or administrative resources on another PC. If you need to change it, follow these simple instructions.
  1. Run File Explorer.
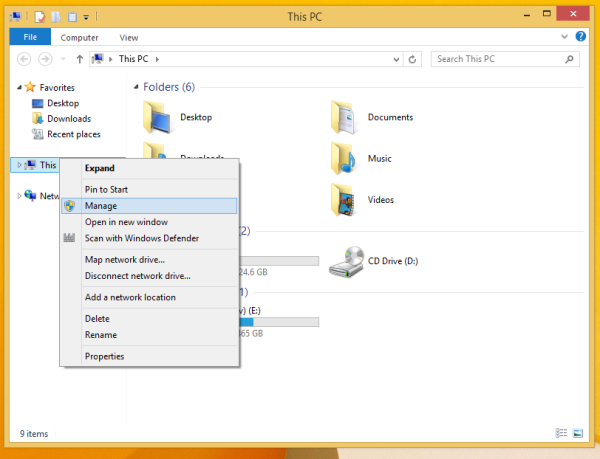
  2. Right click the This PC icon in the navigation pane and select Manage from its context menu:
    manage
  3. The Computer Management window will appear on the screen. In the left pane, expand the tree nodes to go to Computer Management -> System Tools -> Local Users and Groups -> Users.
    local users and groups In the screenshot above, you can see that my actual logon name (user account name) is st, but the logon screen of Windows 8.1 shows the display name, which is 'Sergey Tkachenko'.
  4. Select the user name from the list in the right pane, right click it and choose Rename.
    rename
  5. The first column of the user list will become editable, so you can specify a new logon name:
    new login name   Press Enter. Now you can close Computer Management.
That's it. As you can see, it is very easy to change your logon name. This is an old, well known trick and is also applicable to very old versions of Windows such as Windows 2000. But ever since Windows XP, the User Accounts Control Panel only lets you change the user name. You need to use Local Users and Groups MMC snap-in or the Advanced User Accounts Control Panel (netplwiz.exe) to change the logon name.

Saturday, 17 January 2015

How to find your Wi-Fi password in Windows 8.1

This happens to me often, especially when I'm visiting relatives' houses: My computer knows the Wi-Fi password from when I last connected to the network -- two years ago -- but I've completely forgotten it, though my mother is about 65 percent sure she wrote it down on a Post-it note seven months ago.
A forgotten Wi-Fi password isn't a problem for me and my omniscient laptop, but it is a problem for, say, my brother, who needs the password if he wants to jump on the network with his Japanese iPhone. My mom is hunting for the Post-it, but prospects are lookin' bleak.

Luckily, there's an easy way to reverse-lookup your Wi-Fi password on a computer that already technically knows it. Here's how to find saved network passwords in Windows 8.1:

Step 1: Make sure you're connected to your Wi-Fi network. If you're not connected, open the Charms bar by swiping in from the right side of the screen, or by moving your mouse into the upper right corner of the screen, and click Settings. Tap or click the network icon, find your network and click Connect.

Your PC should connect to your Wi-Fi network automatically, with the saved (but forgotten) password.
Step 2: From the desktop, open the Charms bar, click Settings and then open the Control Panel.
Step 3: Under Network and Internet, click View network status and tasks.

Step 4: Next to the word Connections, you should see a Wi-Fi icon and the name of your Wi-Fi network. Click your Wi-Fi network and a Wi-Fi Status window will pop up. Click Wireless Properties.
Step 5: A new window will pop up. Tap or click the Security tab and you will see your Network security key displayed as a series of black dots. Check the box next to Show characters and voila -- there's your Wi-Fi password!

Tuesday, 28 October 2014

How to run Windows XP programs in Windows Vista, Windows 7 and Windows 8


How to run Windows XP programs in Windows Vista, Windows 7 and Windows 8

How to run Windows XP programs in Windows Vista, Windows 7 and Windows 8

Microsoft has killed support for Windows XP, but that doesn't mean you have to get rid of all your old software. Here we show you how to run Windows XP programs in Windows Vista, Windows 7 and Windows 8. Also see: Windows 10 hands-on review and Windows 10 release date, price and new features.

If you still have a few legacy applications that require Windows XP or you just want to test a program to make sure it works on the legacy operating system, it’s relatively simple to install and run it in a virtual PC environment. Also see: How to install a virtual machine.

Windows XP is no longer available to buy and although there are illegal copies to be found circulating the internet, you can download a pre-built virtual PC directly from Microsoft, which you can be confident will be malware-free. Microsoft provides these virtual machines to help developers test old versions of Internet Explorer, but they provide a full XP environment in which you can run any programs you wish.

Virtual PCs are available for a number of platforms, but we’ll use Oracle’s free VirtualBox software in this example. Once you have VirtualBox installed and working, go to modern.ie and select ‘VirtualBox on Windows’, then scroll down to Windows XP. Download the three files listed under IE8 and save them to a folder on your hard drive. Once they have downloaded, run the file called part1.exe and it will extract a file called IE8 – WinXP.OVA. Double-click this file to import it into VirtualBox and your Windows XP virtual PC will be installed.

You can now launch Windows XP from within VirtualBox and install any software you wish. The operating system is time limited to 30 days, but it’s possible to activate it for permanent use if you are in possession of a valid key


tags:

How to run Windows XP programs in Windows Vista, Windows 7 and Windows 8